
Step 1 – Find Grow Room Space
The first step to setting up a grow room begins with finding a space that is out of the way with no traffic.
You will need to know how many plants you are planning on, what types of growing mediums you plan on using, the lighting that will be utilized, and how to supply the electrical needs to the grow room are the important factors to consider. Having a well-thought-out plan will save you money and time.
Step 2 – Clean Designated Grow Room Space
The second step in the process is to remove everything from the area and enclose the area that you plan on turning into a grow room so basically removing everything from the area except for the walls, ceiling, and floor.
If the space in the basement is unfinished then you can build rooms in the basement room. Building a room within the room will help you to keep noise and heat under better control.
You will be able to place the lighting ballasts outside of the room which will help your room remain cooler. If you are building a room, you can insulate the walls and ceiling so they do not radiate heat through the rest of the house.
Building a room has the benefit of being able to install ventilation ducts through the walls and ceiling that will not interfere with the house structure.

Step 3 – Build the Grow Room
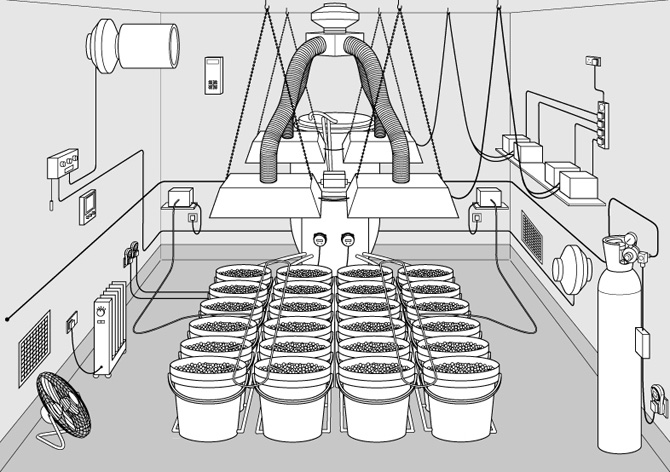
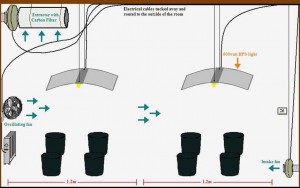
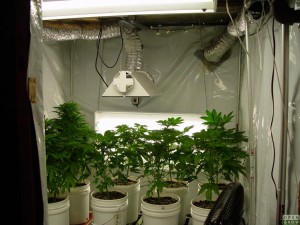
Step three in the process is to cover the walls, ceiling, and floor within the grow room with a highly reflective material. Adding reflective material to the room will increase the reflectiveness of the room so the plants will be able to capture more light for their growth.
Step 4 – Ensure Fresh Air Circulation In Grow Room
The fourth step in the process is providing constant air circulation and fresh air to the grow room. Fresh air and circulation are essential for plants to remain healthy. Oscillating fans work well to circulate air around the room while #1excludeGlossary inline fans work well to bring in the fresh air and remove heat from lights.
Step 5 – Have Water Source Available To Grow Room
Step five in the process is to be sure you have access to a water source that is close otherwise you will be walking around with buckets of water to refill your grow room.
If your washer or water heater is in the basement, you will be able to attach a water manifold (with an on/off water valve) to both the hot and cold water hose bib.
This will allow you to continue using the water for your water heater and washer, but it provides you the ability to get the hot/cold water you will need. Using a water hose will give you the distance you need to get the water to your garden.
If you are going to be misting or watering your plants with the hose then you will want to use a watering wand with a flexible hose adapter to make it easy when reaching over and around plants, so you don’t break the plant’s branches.
Step 6 – Grow Room Flooring
The sixth step in the process is to make sure that the floor of the growing room has a smooth surface and concrete with drains is preferred. Other flooring covered will work to keep moisture from contacting wood or carpeted floors. Having rooms with flat, smooth floors will be easier to clean if water spills, dirt falls, and leaves crumble.
Step 7 – Installing Grow Rooms Lights
 Step seven in the process is to mount hooks into the ceiling for the installation of the lights. Check the size of the lights (between their hanging systems) before you place hooks into the ceiling.
Be sure to use hooks, chains, and light holders that can support the weight of the lights. Many large lights with glass will weigh more than 30 pounds each.
Step 8 – Get Your Grow Room Tools
The eighth step in the process is to bring in the indoor gardening tools that you will need for your garden. By placing the hygrometer and thermometer in the grow room before you bring in plants then you will be able to check the ambient air temperature and humidity before you turn your lights on and off.
Ensuring that your growing environment is right for your future plants will help to ensure your plants will be able to live in the environment.
Step 9 – Setup Lamps And Ballasts For Grow Room

Step nine in the process is to set up your lamps and ballasts in your growing area. Be sure to read through the directions that are given in the box to ensure the proper installation of your equipment.
You wouldn’t want to blow out your lights or start a fire because of installing them improperly. After installing lights in your room, check the ambient air temperature and humidity to make sure the levels are within range for your plants.
Step 10 – Final Step Is Installing The Growing System
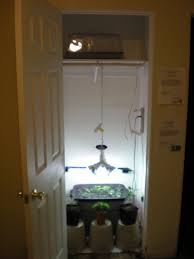
The tenth and final step in the process is to move the growing system (soil containers, hydroponics, etc.) into the area with the plants and set them up in the room as required.
At this point, you might need to re-adjust your light’s distance to the plants, move plants around and adjust the flow of the fans circulating in your room…getting everything in its place and set right.
After you have everything in place inside your grow room, you will want to keep a watchful eye out for any problems that may occur such as high/low humidity levels, high/low temperatures, heat stress, etc.
If a problem occurs you will need to adjust different aspects of your grow room from more/less ventilation, more/less circulation, more/fewer lights, etc., and make any changes to balance the growing environment to ensure your plants are alive and well.
Let us know what you think.