


Weed cultivators are already comfortable with the concept of Water Activity (aw) and it’s known as Relative Humidity (RH) – most of the time – which is measured in air and expressed on a scale from 0 – 100%.
Water Activity is the same concept applied to a porous medium like food, pharmaceuticals, or weed, and it’s expressed on a scale from zero (0) to one (1).
When a weed flower is in equilibrium with the air around it, the RH of the air will be equal to the Water Activity (aw) of the weed but times one hundred (100x) since it is expressed as a percentage.
Weed Plant Relative Humidity (RH) is already a consideration at most processing operations, but when your plants are in drying rooms with a specific RH and dried out, how do you know when to stop drying?
So, for example, it’s a bit like cooking a turkey in an oven during the holidays since it is typically roasted at 325° F (163° C), but it’s not only being cooked up to that exact temperature but holding until the internal temperature is the same as the external.
When it is raised to the 325° F (163° C) temperature that’s required then it’s considered safe for human consumption so you know when the turkey is done by using a measuring device to determine the inside temperature of it.
To do that, you need to define when it’s “done” so safety standards define the “Lower Limit” that’s recommended by food industry government regulators, so when cooking a turkey to a minimum of 165° F (74° C) for its internal temperature before being safe for human consumption.
If safety defines the “Lower Limit,” then it’s the quality of food preparation that defines the “Upper Limit” since it varies depending on cooking preferences, the type of weed-infused product being made, and the temperatures can range drastically if you’re making “Space Brownies” or hard candies.
Using the safety (aka “Lower Limit”) and quality (aka “Upper Limit”) boundaries, you can define a “sweet spot” where your weed-infused food will be safe for human consumption and produce a high-quality product.

Water curing is an alternative yet efficient method in weed processing that involves submerging dried weed buds in water to remove impurities and improve overall quality.
Our cultivation experts with years of experience will guide you through the intricacies of water curing, under-pinned by scientific insights and practical data.
The term curing pot refers to the crucial process of curing weed buds after they have been harvested and dried. Curing is essential in weed cultivation, enhancing flavor, aroma, and the overall quality of dried herbs.
The primary goal of curing is to eliminate the irritating compounds present in weed flowers since it facilitates the breakdown of chlorophyll and sugars, which can make the smoking experience harsh.
By curing, these compounds decompose, resulting in smoother, more flavorful, and more enjoyable smoke. While traditional curing often takes several weeks, water-curing weed significantly reduces this time to just a few days.
However, it’s important to understand the key drawbacks of water-curing weed since THC and CBD are fat-soluble, they remain intact during the process. Water curing accelerates the breakdown of chlorophyll and sugars so it can enhance the smoothness of weed smoke.
Yet, weed also contains water-soluble compounds, like terpenes, which can be lost in the process so this loss may reduce the odor and flavor complexity of cured weed.
While this can be seen as a disadvantage for those who value a robust aroma and terpene profile, water curing is a great technique for prioritizing faster results over flavor nuances.
In the context of drying & curing buds, the traditional method involves placing dried weed in glass jars to mature over several weeks, with regular “burping” to release excess moisture.
In contrast, water curing requires submerging buds for several days, which not only accelerates the breakdown of undesirable substances but also yields a faster turnaround.
However, growers should be aware that while water curing significantly speeds up the curing process, it may compromise the complexity of the herb’s flavor profile.
Overall, both drying & curing processes elevate the weed taste, aroma, and overall smoking experience, so for those looking for a quicker way to cure weed, water curing can serve as a useful shortcut, despite the potential drawbacks.
It’s an effective technique for breaking down harsh substances, ultimately resulting in a smoother smoke. But if robust terpene retention and enhanced flavor complexity are your goals, the traditional drying and curing approach is preferable.
Nevertheless, understanding these methods and their effects on weed quality is vital for achieving the best results, whether you’re a beginner or an experienced cultivator.

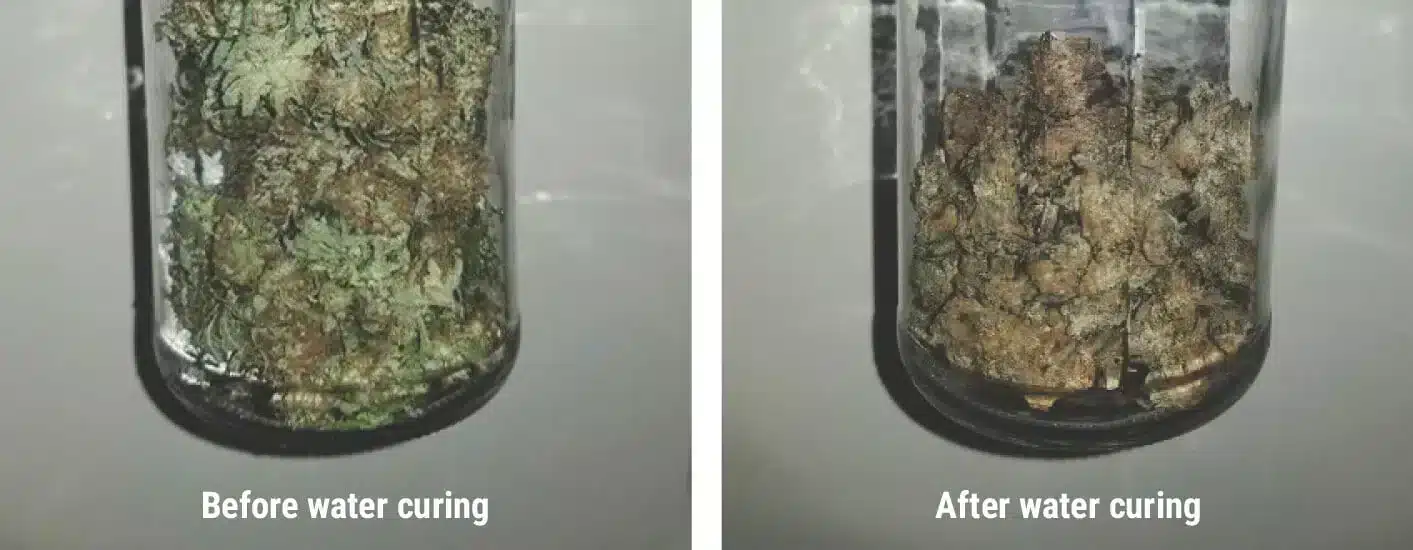


Water curing isn’t just a time-saving alternative; it’s a method rooted in scientific principles that maximize efficiency. When weed buds are submerged in water, water-soluble compounds, such as chlorophyll, plant sugars, and other impurities, rapidly dissolve.
This makes water curing an effective way to remove the elements that often cause a harsh smoking experience. The result is smoother, less irritating smoke that can be enjoyed sooner than traditionally cured weed.
However, one critical aspect to understand is that cannabinoids like THC and CBD are hydrophobic, meaning they don’t dissolve in water.
This ensures that the bud potency is preserved throughout the water-curing process, making it a reliable option for those looking to maintain psychoactive effects while improving smoke smoothness.
Water Curing Step-by-Step Guide
This guide aims to provide the most comprehensive steps for water-curing weed, ensuring each stage is clear, accurate, and optimized for the best results.
Step 1: Prepare Your Equipment (~10 minutes)
- Materials: Trimmed weed buds, glass jars (preferably mason jars with lids), filtered or reverse osmosis (RO) water, a drying rack, and weights to submerge buds.
- Setup: Ensure all tools are sanitized and the workspace is clean to prevent contamination or mold throughout the curing process.
- Tip: Use filtered or RO water to avoid introducing unwanted minerals, which can affect the curing quality.
Step 2: Trim Buds Thoroughly (~30 Minutes)
- Goal: Carefully trim away excess leaves, fan leaves, and stems, leaving well-manicured buds.
- Purpose: Proper trimming allows for better water penetration and faster removal of impurities, ensuring more efficient curing.
- Important: For best results, trim buds immediately after harvest to retain freshness before submerging them in water.
Step 3: Submerge Buds Underwater (~5 Minutes)
- Process: Fill mason jars with cold, clean water at room temperature 65 – 75°F (18 – 24°C).
- Action: Place trimmed buds into the jars, ensuring they are fully submerged; use a sterilized weight to keep buds below the water’s surface (if needed).
- Key Point: Submerging buds fully helps achieve even curing by allowing the water to extract unwanted compounds uniformly across the buds.
Step 4: Change Water Regularly (1-Time / Day)
- Routine: Replace the water daily for 5 – 7 days to ensure the continuous removal of chlorophyll, sugars, and other compounds.
- Procedure: Gently shake the jars during each water change to help dislodge impurities and promote thorough extraction.
- Consistency: Water changes should be consistent, twice a day, to prevent stagnation and avoid developing bacteria or mold within the jars.
Step 5: Monitor Water Clarity (5 – 7 Days)
- Observation: Continue the water curing process for 5 – 7 days, depending on the clarity of the water and the desired smoothness of the buds.
- Indicator: Once the water remains clear after a 12-hour soak verifies that the majority of compounds have been extracted and indicates the weed curing process is complete.
- Adjustment: If smoother smoke is desired, allow an extra day of curing, but be aware this may lead to further terpene loss, affecting the flavor.
Step 6: Dry Cured Buds (1 – 3 Days)
- Initial Drying: After water curing, remove the buds from the jars and gently pat them dry with a clean, lint-free cloth to remove excess moisture.
- Air Drying: Spread the buds on a drying rack in a dark, well-ventilated room with 45 – 55% Relative Humidity (RH) to ensure a slow and thorough drying process.
- Duration: Allow the buds to dry for 1 – 3 days, flipping them occasionally to prevent moisture retention and mold growth.
Step 7: Final Quality Inspection (5 – 10 Minutes)
- Inspection: After drying, examine the buds for any remaining moisture, mold, or off-odors. The buds should have a light, crisp texture and break apart easily without being overly brittle.
- Weed Curing: For improved flavor and potency, place the dried buds in glass jars for an additional air-curing period of 1 – 2 weeks, but this step is optional and not required for immediate consumption.
Water curing offers a rapid way to achieve smoother smoke by removing harsh compounds, though it sacrifices some flavor and aroma. This guide ensures a thorough, effective water-curing process, making it ideal for both beginner and experienced cultivators.
- Water Temperature: Keep water between 65 – 75° F (18 – 24 C) to prevent cannabinoid degradation while promoting efficient curing.
- Ensure Full Submersion: Use weights to keep buds completely submerged for even curing.
- Changing Water: Set reminders to change water twice (2x) daily to avoid mold risks and maximize impurity removal.
- Distilled Water: This helps prevent chlorine or mineral interference, improving the overall curing process.
- Inspect Regularly: Watch for mold, discoloration, or other quality issues during curing and drying.


What’s the Difference? Although they sound similar, water curing and bud washing are different techniques that achieve different goals.
Bud washing simply refers to using water to quickly clean buds after harvest. Unlike water curing, which keeps buds submerged for several days, bud washing takes place over a matter of minutes.
When bud washing, growers dunk their flowers into a series of buckets to clean the debris from their buds and improve their taste. After giving them a quick clean, they move them straight to the drying rack.
Water curing and bud washing aren’t a replacement for each other, though growers have the choice of bud washing before placing their flowers into jars to water cure them.
Bud washing ultimately helps to remove dust, pesticides, insects, and other unwanted particles from weed flowers, leaving them squeaky clean and in better condition. Washing buds before water curing means your flowers won’t be floating around in a bath of nasty chemicals.
Growers that opt for air curing can also use bud washing before drying and curing their stash to remove any chemicals that will impact the taste at the end of the process.
Growing weed outdoors offers many benefits, such as full-spectrum natural sunlight, which is free, and fewer limitations on plant size, resulting in larger yields. However, outdoor cultivation presents challenges, including uncontrollable factors like unpredictable weather and exposure to pests and pathogens, which indoor growers largely avoid.
Despite the best efforts to manage insects and parasitic fungi, outdoor weeds can accumulate dirt and debris throughout the flowering period, compromising the final product’s quality. In this post, we’ll explore bud washing (also known as weed washing), a technique to cleanse freshly harvested buds, ensuring cleaner, healthier, and more flavorful weed flowers.
The sticky trichomes on weed flowers easily attract contaminants as they develop. This includes pests like spider mites, aphids, or thrips that feed on the plants, as well as insects such as flies, gnats, or wasps, which can get stuck on the sticky buds.
Additionally, pests may lay eggs, caterpillars leave droppings, and fallen leaves from surrounding trees can stick to the buds. Birds might leave droppings or even feathers on the plants as they search for insects.
Fungal spores are another persistent issue. They are present in the air and can settle on the flowers, posing risks during the drying process. For instance, botrytis infection might leave behind spores that can be problematic, even after removing affected parts of the plant.
Powdery mildew can also create white patches on flowers and sugar leaves, which should be addressed during bud washing. Moreover, if fungicides or pesticides have been used during flowering, residues may linger on the buds, potentially impacting flavor and consumer safety.

It’s not just insects and fungi that contaminate your buds. If you’re growing weed in a dry climate, wind can blow dirt onto your plants, and weather systems can bring fine particles of sand, clay, ash, or dust over long distances, depositing them on your plants via raindrops.
This phenomenon sometimes occurs in Europe, where after a rainstorm, a layer of Saharan sand can be found on cars, roofs, trees, and drying weed flowers. While this contamination isn’t harmful, it affects the flavor, aroma, and overall quality when curing weed.
These contaminants degrade the quality of curing pot, making consumption less enjoyable and potentially harmful.
That’s why more outdoor growers have adopted bud washing (also known as weed washing) to cleanse their harvested buds before drying.
The process involves rinsing the buds in clean water to remove dirt, insects, and other debris, ensuring a cleaner, smoother, and healthier smoke
Who should be doing this technique? Like the pros and cons we mentioned earlier, if you like a smooth mouth feel with a little odor using water to cure weed might be a decent choice trying out.
Or, if you’re in a hurry to cure your weed, water curing is a quick way to get it done. We don’t normally go for this method, but we know it is possible so we thought we would share. We know it’s controversial and would suggest that you only go this route if you have a specific set of goals you’re trying to achieve.
We understand – getting curing weed buds wet at harvest time may seem counterintuitive since most growers try to avoid wetting flowers.
But, weed washing is a simple and effective technique that can transform low-quality crops into top-shelf weed products, yet if you’re unsure, keep reading; you may be pleasantly surprised by the results.
The bud washing method is straightforward, start by submerging the buds in a mild cleaning solution to remove most dirt and debris.
Follow with a second wash in clean water to clear any remaining contamination then finish with a third rinse in fresh water, preparing the buds for the drying phase.
For drying weed, you need three (3) buckets that ideally are five (5) gallons (20 liters) each, along with filtered water, optional cleaning agents like lemon juice or baking soda, and a drying rack once rinsed, hang the buds to dry completely before moving on to the curing process.
What’s the Difference? Although they sound similar, water curing and bud washing are very different techniques that achieve different goals.
Bud washing simply refers to using water to quickly clean buds after harvest. Unlike water curing, which keeps buds submerged for several days, bud washing takes place over a matter of minutes.
When bud washing, growers dunk their flowers into a series of buckets to clean the debris from their buds and improve their taste. After giving them a quick clean, they move them straight to the drying rack.
Water curing and bud washing aren’t replacement for each other, though growers have the choice of bud washing before placing their flowers into jars to water cure them.
Bud washing ultimately helps to remove dust, pesticides, insects, and other unwanted particles from weed flowers, leaving them squeaky clean and in better condition. Washing buds before water curing means your flowers won’t be floating around in a bath of nasty chemicals.
Growers that opt for air curing can also use bud washing before drying and curing their stash to remove any chemicals that will impact the taste at the end of the process.
Growing weed outdoors offers many benefits, such as full-spectrum natural sunlight, which is free, and fewer limitations on plant size, resulting in larger yields. However, outdoor cultivation presents challenges, including uncontrollable factors like unpredictable weather and exposure to pests and pathogens, which indoor growers largely avoid.
Despite the best efforts to manage insects and parasitic fungi, outdoor weeds can accumulate dirt and debris throughout the flowering period, compromising the final product’s quality. In this post, we’ll explore bud washing (also known as weed washing), a technique to cleanse freshly harvested buds, ensuring cleaner, healthier, and more flavorful weed flowers.
The sticky trichomes on weed flowers easily attract contaminants as they develop. This includes pests like spider mites, aphids, or thrips that feed on the plants, as well as insects such as flies, gnats, or wasps, which can get stuck on the sticky buds.
Additionally, pests may lay eggs, caterpillars leave droppings, and fallen leaves from surrounding trees can stick to the buds. Birds might leave droppings or even feathers on the plants as they search for insects.
Fungal spores are another persistent issue. They are present in the air and can settle on the flowers, posing risks during the drying process. For instance, botrytis infection might leave behind spores that can be problematic, even after removing affected parts of the plant.
Powdery mildew can also create white patches on flowers and sugar leaves, which should be addressed during bud washing. Moreover, if fungicides or pesticides have been used during flowering, residues may linger on the buds, potentially impacting flavor and consumer safety.
It’s not just insects and fungi that contaminate your buds. If you’re growing weed in a dry climate, wind can blow dirt onto your plants, and weather systems can bring fine particles of sand, clay, ash, or dust over long distances, depositing them on your plants via raindrops.
This phenomenon sometimes occurs in Europe, where after a rainstorm, a layer of Saharan sand can be found on cars, roofs, trees, and, of course, on drying weed flowers. While this type of contamination isn’t harmful, it affects the flavor, aroma, and overall quality of the cured weed.
These contaminants degrade the quality of curing pot, making consumption less enjoyable and potentially harmful. That’s why more outdoor growers have adopted bud washing (also known as weed washing) to cleanse their harvested buds before drying. The process involves rinsing the buds in clean water to remove dirt, insects, and other debris, ensuring a cleaner, smoother, and healthier smoke
Who should be doing this technique? Like the pros and cons we mentioned earlier, if you like a smooth mouth feel has little odor using water to cure weed might be a decent choice (possibly).
Or, if you’re in a hurry to cure your weed, after-curing is a quick way to get it done. We don’t normally use this method, but we do know it is possible so we thought we would share. We know it is a controversial one and we would suggest that you only go this route if you have a specific set of goals you’re trying to achieve.
We understand – getting curing weed buds wet at harvest time may seem counterintuitive since most growers try to avoid wetting flowers.
But weed washing is a simple and effective technique that can transform many low-quality crops into a top-shelf “Canna Cup” winning weed, yet if you’re unsure, keep reading sinceyou may be pleasantly surprised by the results.
The bud washing method is straightforward: start by submerging the buds in a mild cleaning solution to remove most dirt and debris.
Follow with a second wash in clean water to clear any remaining contamination. Finish with a third rinse in fresh water, preparing the buds for the drying phase.
For drying weed, all you need are three buckets (20 liters each), filtered water, optional cleaning agents like lemon juice or baking soda, and a drying rack. Once rinsed, hang the buds to dry completely before moving on to the curing process.